ブログ


【Amazon Linux 2】 Laravelが動く環境を構築する
こんにちは、T.Uです。
勉強のためにLaravelが動く環境を構築することがありましたので、AWSのAmazon Linux 2でLaravel Jetstreamが動く環境を構築する手順を紹介します。
各バージョンは以下のとおりです。
- Laravel 11
- Laravel Jetstream
- php 8.2
- Node.js 16
- MySQL 8.4
目次
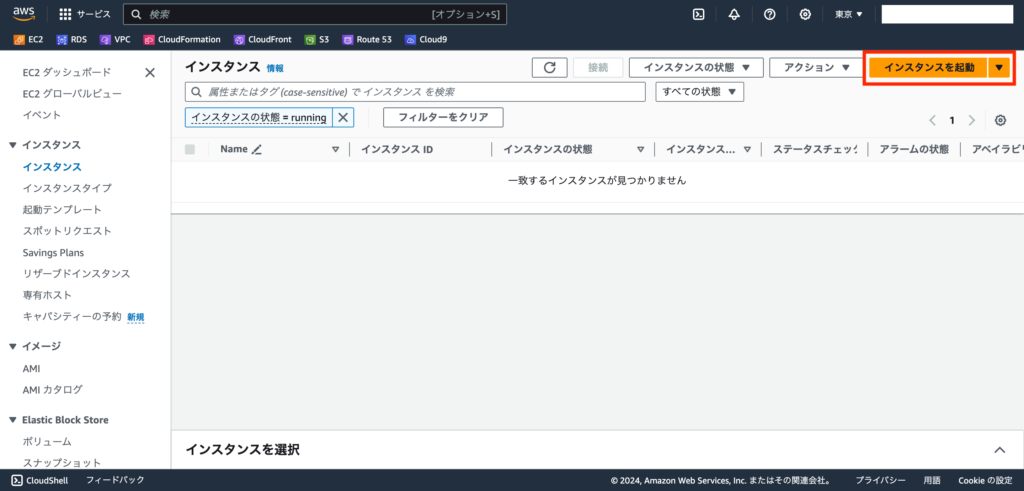
インスタンス作成
まずは、インスタンスを作成します。
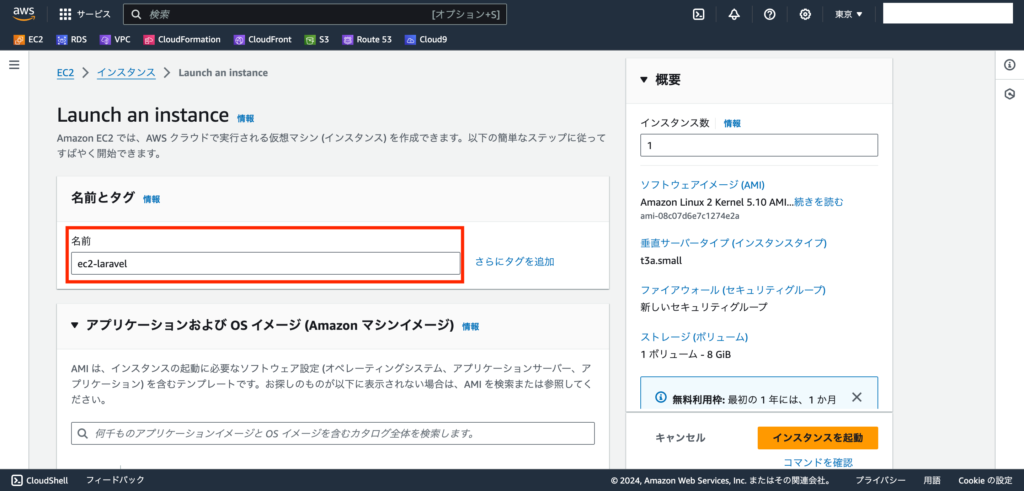
「インスタンスを起動」からインスタンスの情報を入力します。
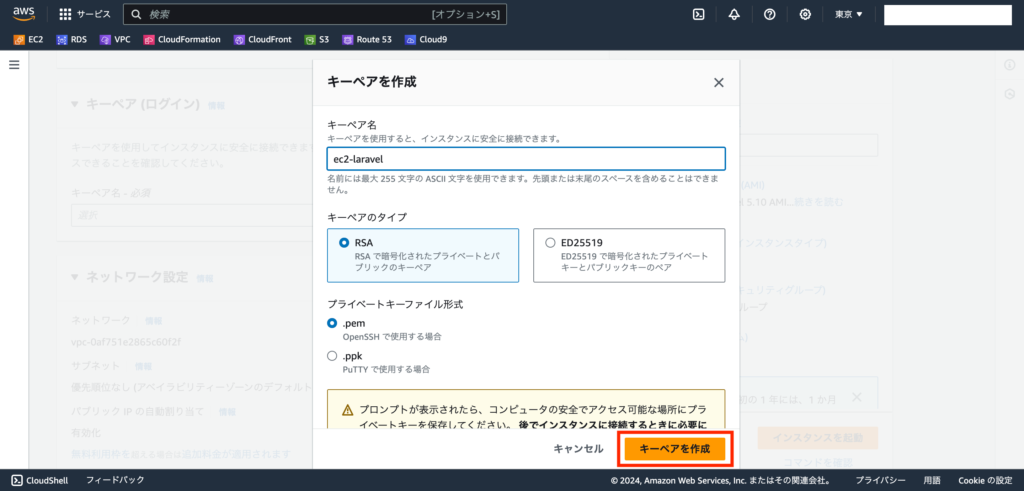
今回は、「名前とタグ」には、「ec2-laravel」を入力します。
わかりやすい名前にしておくと便利です。
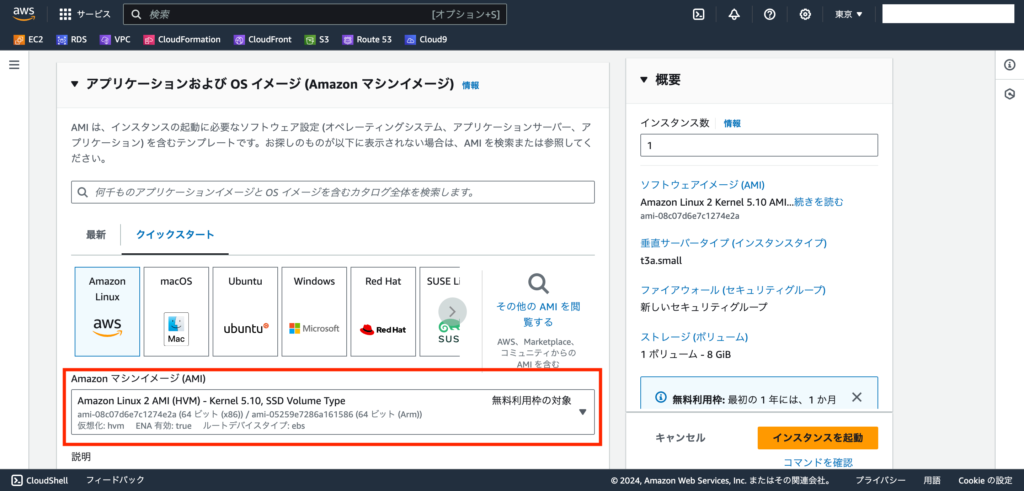
「Amazonマシンイメージ」は、「Amazon Linux 2」を選択します。
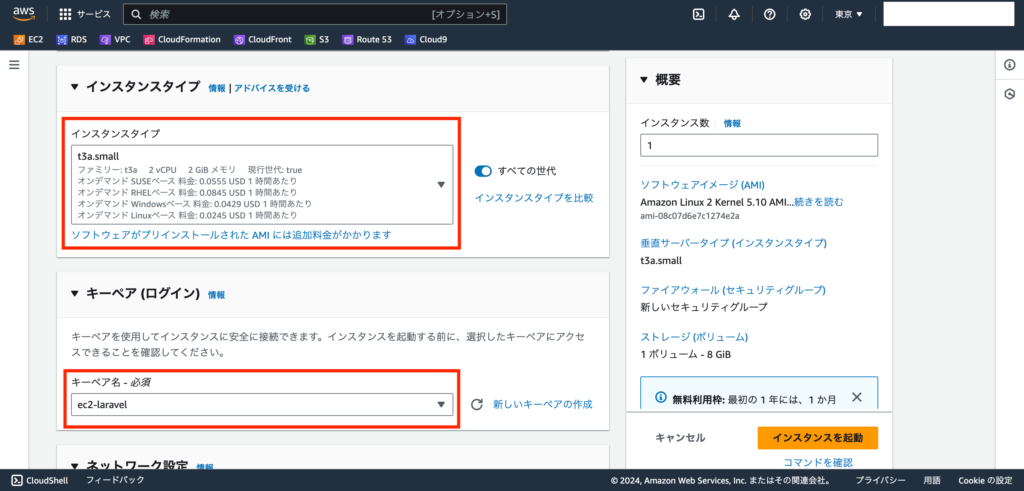
「インスタンスタイプ」には「t3a.small」を選択します。
「キーペア(ログイン)」には「新しいキーペアを作成」からキーペアを作成し、作成したキーペアを選択します。
ネットワーク設定では、以下の設定にします。
- セキュリティグループを作成
- 「自分のIP」からのSSHトラフィックを許可
- インターネットからのHTTPSトラフィックを許可
- インターネットからのHTTPトラフィックを許可
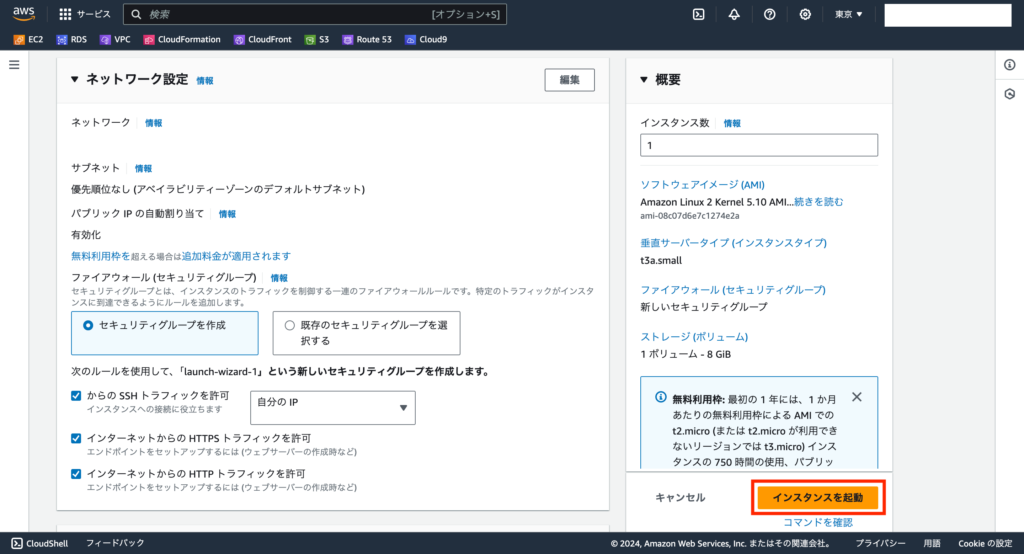
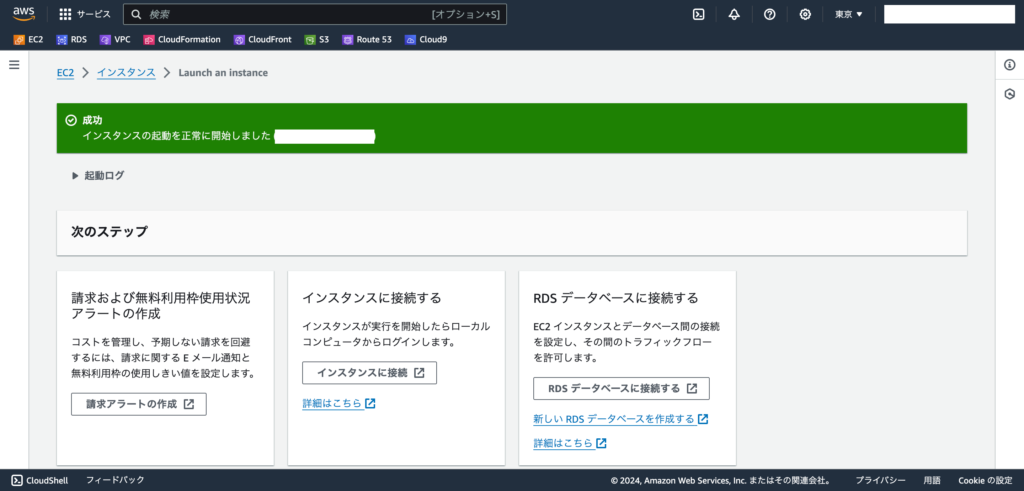
ここまで入力ができたら、「インスタンスを起動」をクリックして、インスタンスを作成します。
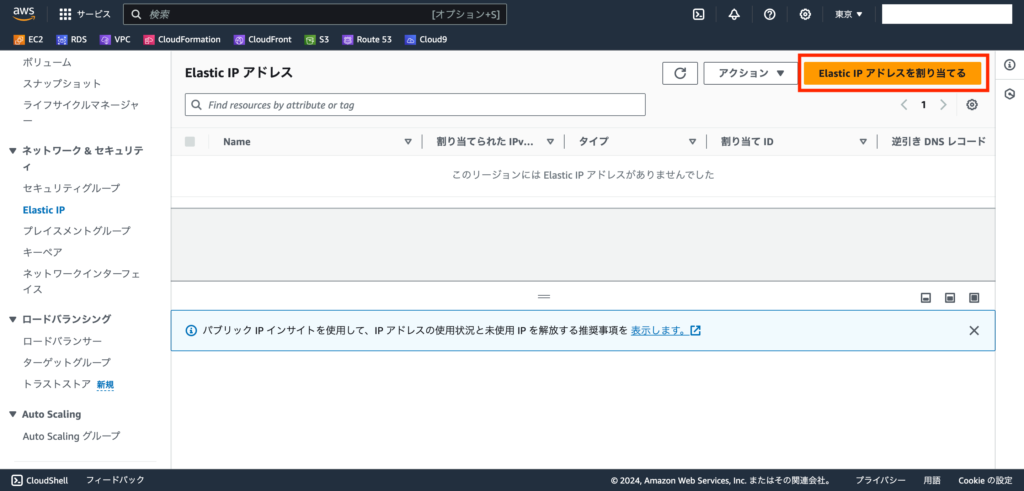
Elastic IPを割り当て
「Elastic IPアドレスを割り当てる」から、Elastic IPを割り当てます。
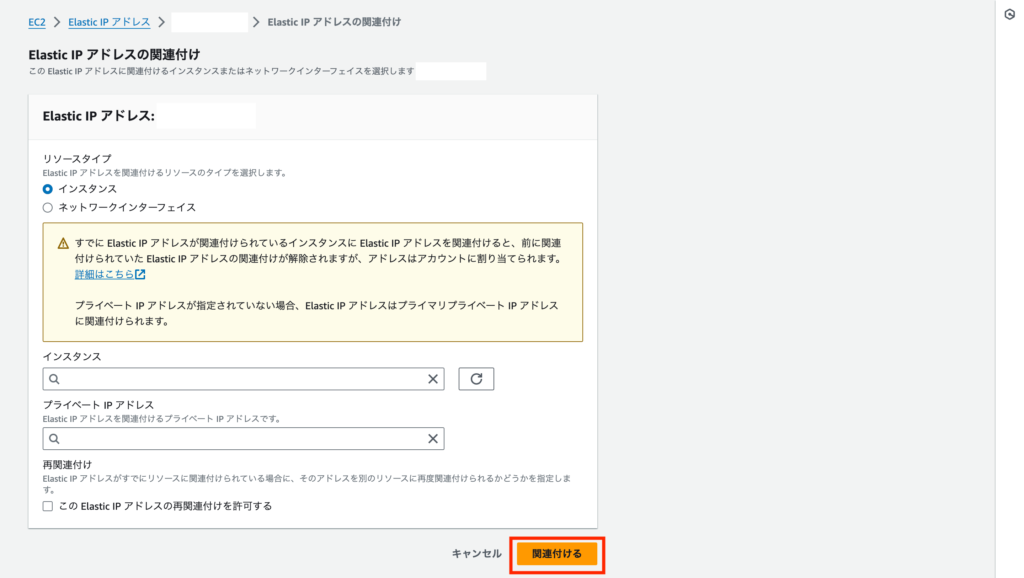
Elastic IPの割り当てができたら、「Elastic IPアドレスの関連付け」から、EC2インスタンスとElastic IPを関連付けます。
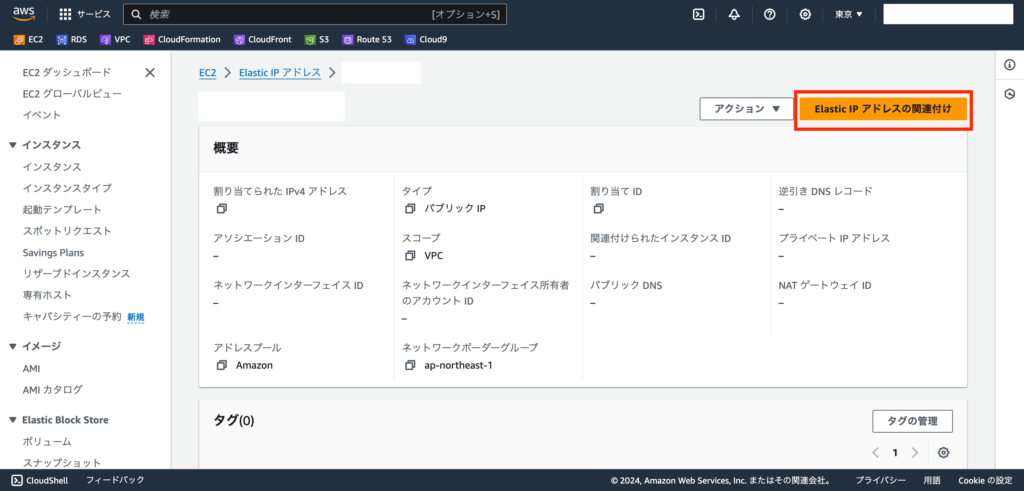
「インスタンス」と「プライベートIPアドレス」を選択したら、「関連付ける」をクリックします。
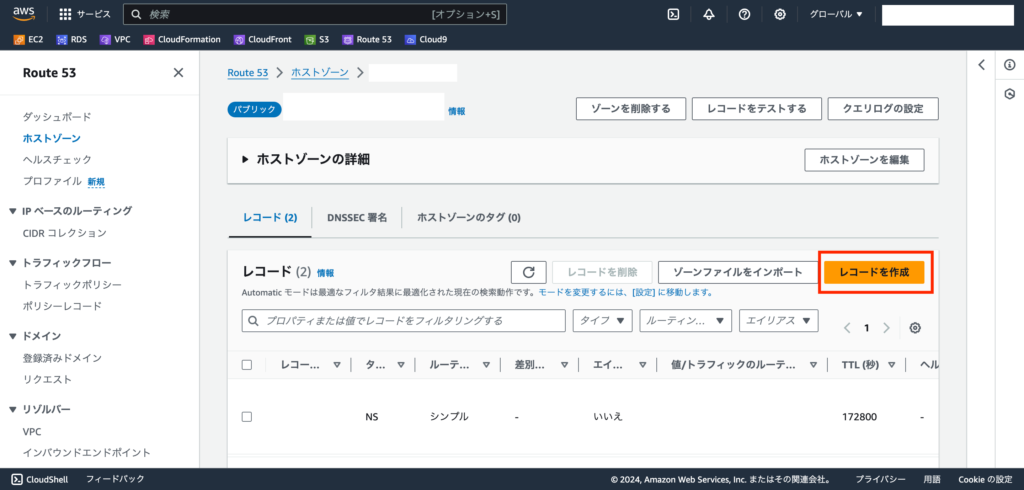
DNS
次は、先ほど登録したElastic IPアドレスを、ドメインに紐づけます。
今回は、Route 53に登録されているドメインに登録するので、「レコードを作成」をクリック。
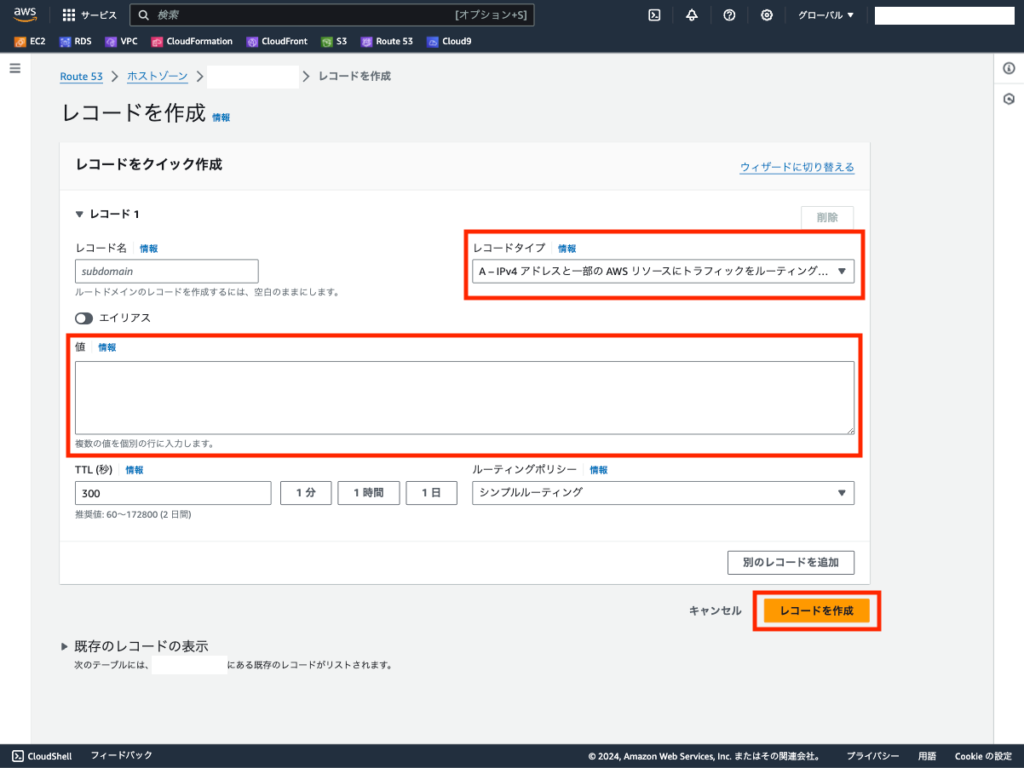
「レコードタイプ」に「A」、「値」に「Elastic IPのIPアドレス」を入力し、「レコードを作成」をクリックして、レコードを登録します。
SSH
インスタンスの作成が完了したら、まずはSSHでインスタンスに接続します。
インスタンスを作成する際に、ダウンロードした鍵ファイルの権限を変更します。
chmod 400 ec2-laravel.pem権限を変更したら、鍵ファイルを使ってインスタンスにSSHします。
IPアドレスには、Elastic IPで登録したIPアドレスを入力します。
ssh -i ec2-laravel.pem ec2-user@[IPアドレス]rootユーザーに切り替え、パッケージをアップデートします。
# rootユーザーに切り替え
sudo su
# パッケージをアップデート
yum update -y
タイムゾーンとロケールの設定
サーバーのタイムゾーンを Asia/Tokyo に設定し、ロケールを日本語に設定します。
# タイムゾーンの設定
timedatectl set-timezone Asia/Tokyo

# ロケールの設定
localectl set-locale LANG=ja_JP.utf8
PHPインストール
amazon-linux-extrasを使用し、 PHP 8.2 をインストールします。amazon-linux-extras は、Amazon Linux 2 で追加のソフトウェアパッケージを簡単に有効化およびインストールするためのツールです。
# PHP 8.2 の有効化
amazon-linux-extras enable php8.2
# メタデータのクリーンアップ
yum clean metadata
# PHP と必要なモジュールのインストール
yum install -y php-cli php-pdo php-fpm php-json php-mysqlnd php-mbstring php-dom php-gd php-intl
PHP が正しくインストールされたかを確認します。
# php -v
PHP 8.2.9 (cli) (built: Aug 24 2023 20:33:12) (NTS)
Copyright (c) The PHP Group
Zend Engine v4.2.9, Copyright (c) Zend Technologies
nginxインストール
次に、nginx をインストールします。
# nginx の有効化
amazon-linux-extras enable nginx1
# メタデータのクリーンアップ
yum clean metadata
# nginx のインストール
yum install -y nginx
nginx を起動し、そのステータスを確認します。
# nginxを起動
systemctl start nginx
# nginxが自動起動されるように設定
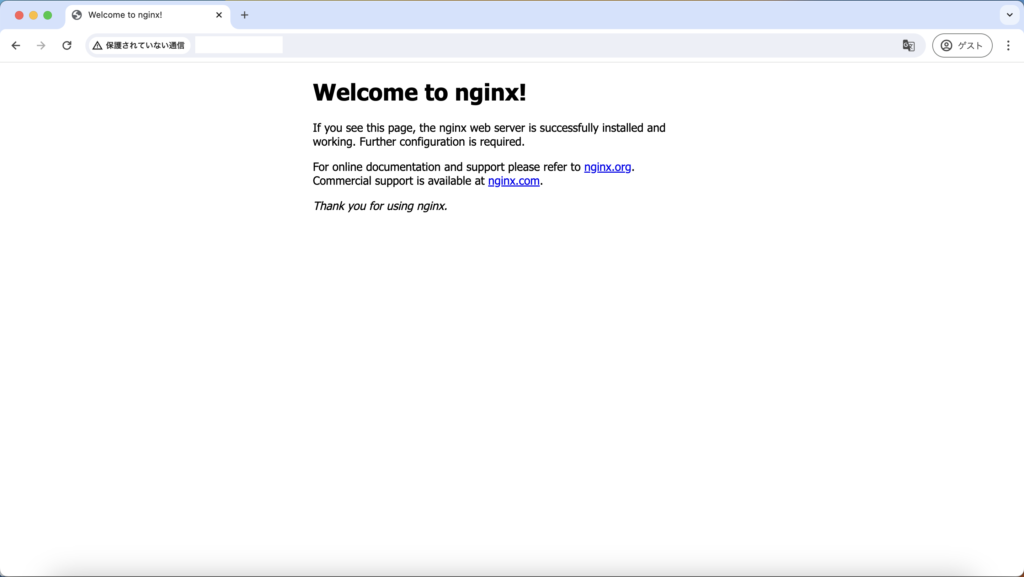
systemctl enable nginxここまでできたら、登録したドメインをブラウザで開くと、nginxのウェルカムページが表示できるようになります。
Composerインストール
次に、Composer をインストールします。
export HOME="/root"
curl -sS https://getcomposer.org/installer | php -- --install-dir=/usr/bin --filename=composer
composer -V で、正しくインストールできたか確認することができます。
以下のようにComposerのバージョンや、PHPのバージョンが出力されます。
# composer -V
Composer version 2.7.6 2024-05-04 23:03:15
PHP version 8.2.9 (/usr/bin/php)
Run the "diagnose" command to get more detailed diagnostics output.
Node.jsインストール
Node.jsをインストールします。
# Node.jsのリポジトリを追加
curl -fsSL https://rpm.nodesource.com/setup_16.x | sudo bash -
# Node.jsをインストール
yum install -y nodejs
Node.jsとnpmが正しくインストールされたか確認します。
# node -v
v16.20.2
# npm -v
8.19.4
Node.js 18や20などの新しいバージョンのNode.jsをインストールしたいところですが、Amazon Linux 2にインストールしようとすると、以下のようなエラーが発生し、インストールすることができません。
Error: Package: 2:nodejs-20.14.0-1nodesource.x86_64 (nodesource-nodejs)
           Requires: libc.so.6(GLIBC_2.28)(64bit)
Error: Package: 2:nodejs-20.14.0-1nodesource.x86_64 (nodesource-nodejs)
           Requires: libm.so.6(GLIBC_2.27)(64bit)
MySQLインストール
MySQLと競合する場合があるため、既存のMariaDBを削除します。
yum remove -y mariadb-libsMySQLのリポジトリを追加し、MySQLサーバーをインストールします。
# MySQL リポジトリの追加
yum install -y https://dev.mysql.com/get/mysql84-community-release-el7-1.noarch.rpm
# MySQL サーバーのインストール
yum install -y mysql-community-server
MySQL サーバーを起動します。
# MySQLを起動
systemctl start mysqld
# MySQLが自動起動されるように設定
systemctl enable mysqld
MySQLが起動できたら、MySQLインストール時に自動生成される、初期パスワードを確認します。
cat /var/log/mysqld.log | grep passwordmysql_secure_installationを実行して、初期設定を行います。mysql_secure_installationを実行すると、初期パスワードの変更、不要なユーザーとデータベースの削除、リモートルートログインの無効化などを行います。
mysql_secure_installation今回は、以下のような感じで入力しました。
Securing the MySQL server deployment.

Enter password for user root: [初期パスワード]
The 'validate_password' component is installed on the server.
The subsequent steps will run with the existing configuration
of the component.
Using existing password for root.

Estimated strength of the password: 100
Change the password for root ? ((Press y|Y for Yes, any other key for No) : y

New password: [新しいパスワード]

Re-enter new password: [新しいパスワードをもう一度]

Estimated strength of the password: 100
Do you wish to continue with the password provided?(Press y|Y for Yes, any other key for No) : y
By default, a MySQL installation has an anonymous user,
allowing anyone to log into MySQL without having to have
a user account created for them. This is intended only for
testing, and to make the installation go a bit smoother.
You should remove them before moving into a production
environment.

Remove anonymous users? (Press y|Y for Yes, any other key for No) : y
Success.


Normally, root should only be allowed to connect from
'localhost'. This ensures that someone cannot guess at
the root password from the network.

Disallow root login remotely? (Press y|Y for Yes, any other key for No) : y
Success.

By default, MySQL comes with a database named 'test' that
anyone can access. This is also intended only for testing,
and should be removed before moving into a production
environment.


Remove test database and access to it? (Press y|Y for Yes, any other key for No) : y
 - Dropping test database...
Success.

 - Removing privileges on test database...
Success.

Reloading the privilege tables will ensure that all changes
made so far will take effect immediately.

Reload privilege tables now? (Press y|Y for Yes, any other key for No) : y
Success.

All done!
MySQLのセットアップができたら、データベースやユーザーを作成します。
# MySQLに接続
mysql -u root -p
上から順番に実行して、データベース作成・ユーザー作成・ユーザーに権限設定を行います。
# データベース作成
CREATE DATABASE app;

# ユーザー作成
CREATE USER 'laravel'@'localhost' IDENTIFIED BY '[パスワード]';

# ユーザーに全権限追加
GRANT all ON app.* TO 'laravel'@'localhost';

## 権限の変更をデータベースに反映
FLUSH PRIVILEGES;
Laravelセットアップ
Laravelを配置するディレクトリを作成し、権限を変更します。
# アプリの配置先を作成
mkdir -p /srv/al2-laravel.wingdoor.co.jp
# ec2-userをnginxグループに追加
usermod -a -G nginx ec2-user
# ファイルの所有者を変更
chown -R ec2-user:nginx /srv/al2-laravel.wingdoor.co.jp
chmod 2775 /srv/al2-laravel.wingdoor.co.jp
アプリの配置先に移動し、Laravelプロジェクトを作成します。
# アプリの配置先に移動
/srv/al2-laravel.wingdoor.co.jp
# 現在のディレクトリにlaravel/laravelをセットアップ
composer create-project laravel/laravel .
Laravel Jetstreamをインストールし、セットアップします。
# Laravel Jetstreamをインストール
composer require laravel/jetstream
# Laravel Jetstream(Inertia.js)をセットアップ
php artisan jetstream:install inertia
.envの以下の項目を変更します。
APP_URL=http://al2-laravel.wingdoor.co.jp
APP_LOCALE=ja
APP_FAKER_LOCALE=ja_JP
DB_CONNECTION=mysql
DB_HOST=127.0.0.1
DB_PORT=3306
DB_DATABASE=app
DB_USERNAME=laravel
DB_PASSWORD=[設定したパスワード]
マイグレーションを実行して、データベースにusersテーブルなどを作成します。
php artisan migrate:freshここまでセットアップできたら、nginxの設定を変更します。
# /etc/nginx/conf.d/al2-laravel.wingdoor.co.jp.conf
server {
    listen 80;
    server_name al2-laravel.wingdoor.co.jp;

    root /srv/al2-laravel.wingdoor.co.jp/public;
    index index.php index.html;
    access_log /var/log/nginx/access.log main;
    error_log /var/log/nginx/error.log;

    client_max_body_size 15m;

    location ^~ /.well-known/acme-challenge/ {
        root /srv/certbot;
        default_type "text/plain";
    }

    location / {
        try_files $uri $uri/ /index.php$is_args$args;
    }

    location ~ \.php$ {
        try_files $uri /index.php =404;
        fastcgi_pass unix:/run/php-fpm/www.sock;
        fastcgi_index index.php;
        fastcgi_param SCRIPT_FILENAME $document_root$fastcgi_script_name;
        include fastcgi_params;
        fastcgi_read_timeout 180;
    }
}
php-fpmの設定を変更します。
# /etc/php-fpm.d/www.conf
user = nginx
group = nginx
nginxとphp-fpmの設定を変更したら、プロセスを再起動します。
また、php-fpmも自動起動されるように設定します。
# nginxを再起動
systemctl restart nginx
# php-fpmを再起動
systemctl restart php-fpm
# php-fpmを自動起動するように設定
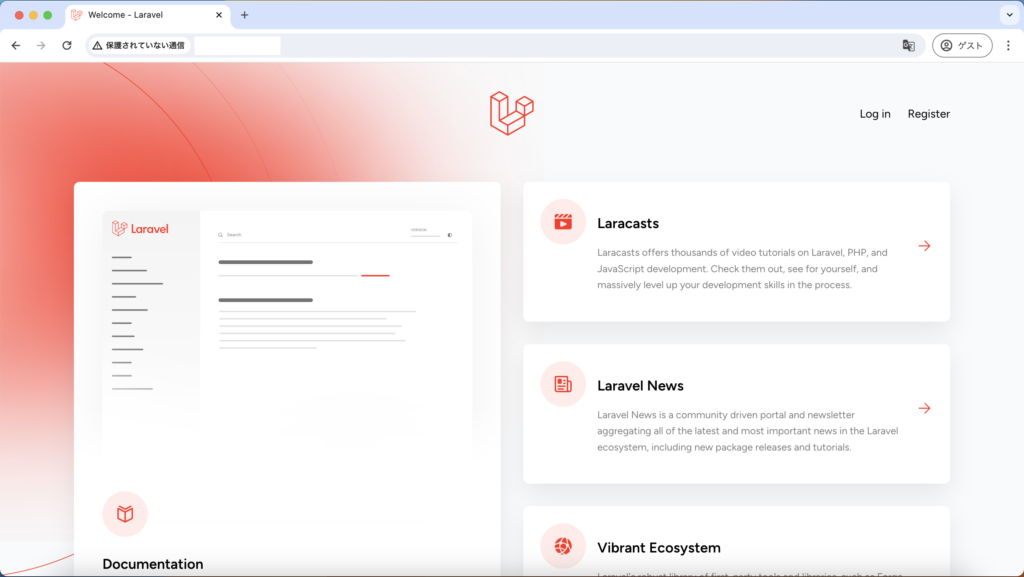
systemctl enable php-fpmここまでできたら、ブラウザで設定したドメインを開くと、Laravelのトップページが表示されるようになります。
https化(常時SSL化)
EPELリポジトリを追加し、Certbotをインストールします。
CertbotはLet’s Encrypt証明書を簡単に取得および更新するためのツールです。
# EPELリポジトリの追加
amazon-linux-extras install -y epel
# メタデータのクリーンアップ
yum clean metadata
# Certbotのインストール
yum install -y certbot
証明書を発行する際に使用されるトークンファイルを保存するディレクトリを作成します。
mkdir /srv/certbotcertbot certonlyで証明書をリクエストします。
今回はトークンファイルで認証する方式(HTTP-01 challenge)の他にも、DNSで認証する方式(DNS-01 challenge)などがあります。
certbot certonly \
    --webroot \
    -w /srv/certbot \
    -d al2-laravel.wingdoor.co.jp \
    -m [メールアドレス] \
    --agree-tos
証明書の発行が成功したら、以下のようなメッセージが表示されます。
ここで、fullchain.pemとprivkey.pemのパスをnginxの設定ファイルに記入するので、控えておきます。
Saving debug log to /var/log/letsencrypt/letsencrypt.log
Plugins selected: Authenticator webroot, Installer None
Requesting a certificate for al2-laravel.wingdoor.co.jp
Performing the following challenges:
http-01 challenge for al2-laravel.wingdoor.co.jp
Using the webroot path /srv/certbot for all unmatched domains.
Waiting for verification...
Cleaning up challenges

IMPORTANT NOTES:
 - Congratulations! Your certificate and chain have been saved at:
   /etc/letsencrypt/live/al2-laravel.wingdoor.co.jp/fullchain.pem
   Your key file has been saved at:
   /etc/letsencrypt/live/al2-laravel.wingdoor.co.jp/privkey.pem
   Your certificate will expire on 2024-08-27. To obtain a new or
   tweaked version of this certificate in the future, simply run
   certbot again. To non-interactively renew *all* of your
   certificates, run "certbot renew"
 - If you like Certbot, please consider supporting our work by:

   Donating to ISRG / Let's Encrypt:   https://letsencrypt.org/donate
   Donating to EFF:                    https://eff.org/donate-le
証明書が発行できたら、nginxの設定を変更します。
# /etc/nginx/conf.d/al2-laravel.wingdoor.co.jp.conf
server {
    listen 80;
    server_name al2-laravel.wingdoor.co.jp;

    location ^~ /.well-known/acme-challenge/ {
        root /srv/certbot;
        default_type "text/plain";
    }

    location / {
        return 301 https://$server_name$request_uri;
    }
}

server {
    listen 443 ssl;
    server_name al2-laravel.wingdoor.co.jp;

    ssl_certificate /etc/letsencrypt/live/al2-laravel.wingdoor.co.jp/fullchain.pem;
    ssl_certificate_key /etc/letsencrypt/live/al2-laravel.wingdoor.co.jp/privkey.pem;

    root /srv/al2-laravel.wingdoor.co.jp/public;
    index index.php index.html;
    access_log /var/log/nginx/access.log main;
    error_log /var/log/nginx/error.log;

    client_max_body_size 15m;

    location / {
        try_files $uri $uri/ /index.php$is_args$args;
    }

    location ~ \.php$ {
        try_files $uri /index.php =404;
        fastcgi_pass unix:/run/php-fpm/www.sock;
        fastcgi_index index.php;
        fastcgi_param SCRIPT_FILENAME $document_root$fastcgi_script_name;
        include fastcgi_params;
        fastcgi_read_timeout 180;
    }
}
nginxの設定ファイルを変更できたら、nginxを再起動します。
# nginxを再起動
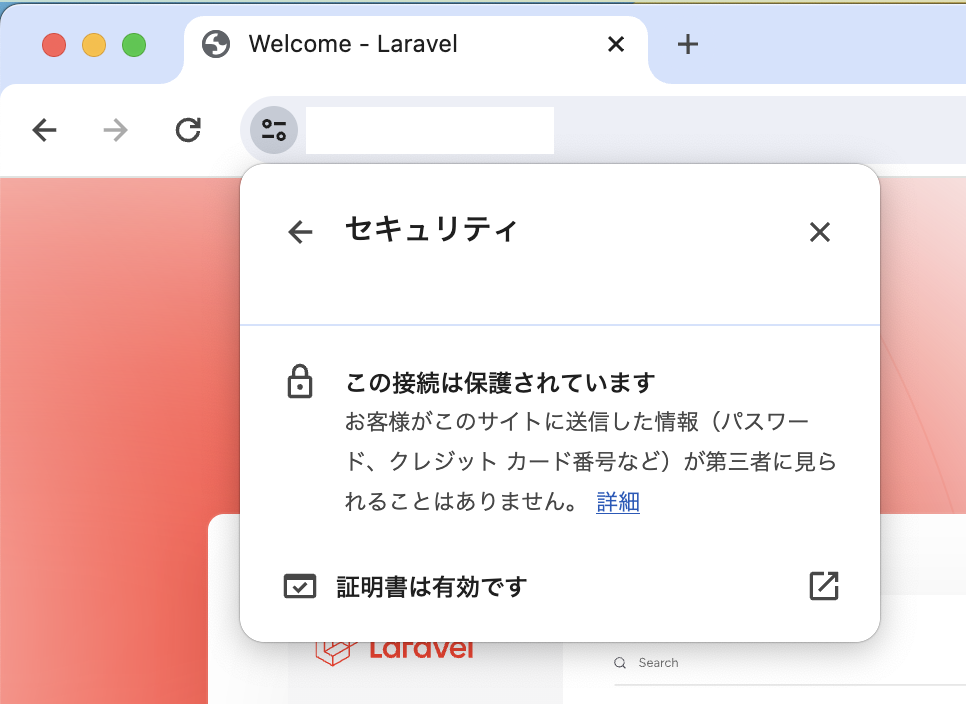
systemctl restart nginx再度、ブラウザで設定したドメインを開くと、https化されていることを確認できます。
株式会社ウイングドアは福岡のシステム開発会社です。
現在、私達と一緒に"楽しく仕事が出来る仲間"として、新卒・中途採用を絶賛募集しています!
ウイングドアの仲間達となら楽しく仕事できるかも?と興味をもった方、
お気軽にお問い合わせ下さい!